Tag: Office 365
-
Are you an Insider?
A decade ago we found ourselves craving new features from Microsoft for the Office platform. We found ourselves getting a Service Pack every 12-18 months that was comprised of hotfixes and perhaps one or two new major features. Release cycles were long and innovation came in fits and spurts. Testing new features was something that…
-
Microsoft Learn
If you find yourself here because you searched on “Microsoft Learn” because you heard about it at a conference or on a podcast or somewhere, you’re in the right place. Microsoft Learn is a site that Microsoft has been slowly but surely growing over the past few years, putting together technical documentation to help you…
-
Sticky Notes
If you’ve been using OneNote for a while you’ve probably found the ability to review tour notes on mobile as something helpful. Caveat, you probably don’t leave OneNote open at all times… and sometimes maybe you don’t need a whole notebook, just a Sticky Note. In Windows 10 you may have noticed an app on…
-
Microsoft 365…
Recently I was speaking with a few individuals in the community and it was oddly interesting to hear that there seemed to be some misconceptions about Microsoft 365 and what exactly it is comprised of… is it the Operating System, or is it Office 365, or is it something else. Literally. Eye opening. So eye…
-
SharePoint, where for art though?
Captain’s log… the vapor and mist of the cloud have formed and we see that things are starting to take shape in the realm of Office 365. Dan Holme and his cadre of excellence have continued to chart forward with making experiences usable by end users, providing capabilities that to build on-premises, while feasible in…
-
Office 365 Home Device Limits…
In case you missed it, Jared Spataro recently announced that the Office 365 Home and Personal subscriptions will no longer have install limits on devices as of October 2, 2018. A caveat to this is that you can only be logged into five devices at a time. In the past it was 10 devices in…
-
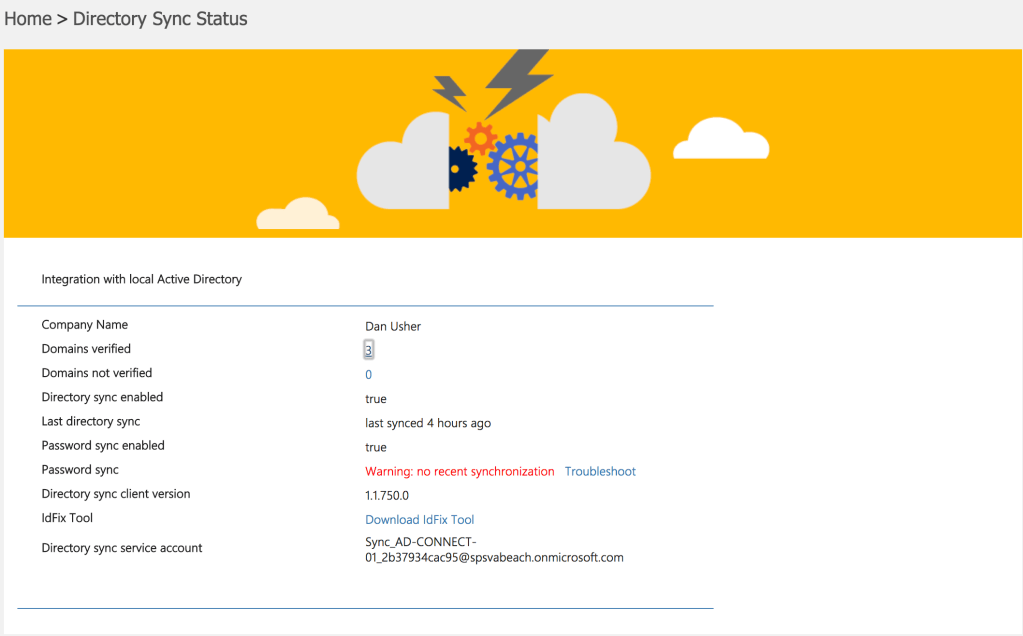
Don’t lose your identity in the Cloud…
If you happen to log into your Office 365 Admin Portal on a regular basis good on you – though perhaps you can get most of your alerts through the Office 365 Admin app on your phone. If you do happen to log in though and you’re using Directory Synchronization by way of either Azure…
-
How do I remove my domain name from Office 365?
So you have a proof of concept Office 365 instance and you realize that you want to take things to Production, but you also realize that you want to keep your POC tenant up and oeprational. Caveat, you went through and applied your Domain Name to your tenant thorugh another registrar. How do you get…
-
Azure: Setting up a custom domain for Office 365 by way of Azure Active Directory
If you’re like me, sometimes you like to do things a little more efficiently and elegantly through PowerShell or through the Azure portal when it deals with the underlying infrastructure that’s associated with an Office 365 tenant. If you’re using Office 365 you’ve established a tenant with a .onmicrosoft.com name. Reminder PSA: You can’t change…
-
Office 365: Managing your users through PowerShell
If you’re like me, then you tend to find yourself wanting to automate as much as possible, or at least be able to work with sets of data in a way that quickly allows you to get to the root of an issue rather than clicking through endless screens of information. In case you were…
