Categories
Azure Cloud SharePoint

Azure Shared Disks are coming!!!

Do you still have a need or desire to continue to run your SharePoint environment in an on-premises data center so that you can have them luxury of Always On Availability Groups with SQL Server? Well… now you can really take that workload to the cloud (with some minor caveats) once Microsoft fully goes GA with the Azure Shared Disks server.

https://azure.microsoft.com/blog/announcing-the-preview-of-azure-shared-disks-for-clustered-applications/

If you’re thinking to yourself, isn’t this just the next revision of Azure Files? Nope, that makes use of SMB and NFS protocols for accessing disk – akin to your favorite file share or iSCSI device. This is effectively zoning disk and making it available to your operating system as a logical volume that can be accessed by your server.

So if you want to create a volume that’s a part of a clustered file share, look no further, we have a “better” solution for you now… the real question of course is what the performance will look like and whether or not it will be able to keep up… I’m pretty certain that this will be something that will become the de facto standard for architects and IT Pros as they begin to set something up in the cloud.

Categories
Azure

Azure: Public Preview of Serial Console

I have to say that this is crazy that Microsoft Azure now supports a Serial Console for Virtual Machines (at least in Public Preview).  Check out the blog entry over here – https://azure.microsoft.com/en-us/updates/azure-serial-console/

I decided to give it a little try to see more and it works like a champ. Very cool to see this capability coming to light as it’s been something that I know I’ve been looking for some time to have available when a VM wasn’t coming back up slower than I would have assumed it would. Well done folks!

Check out the announcement yonder on the Azure blog – https://azure.microsoft.com/en-us/blog/virtual-machine-serial-console-access/

Categories
Azure Cloud Office 365

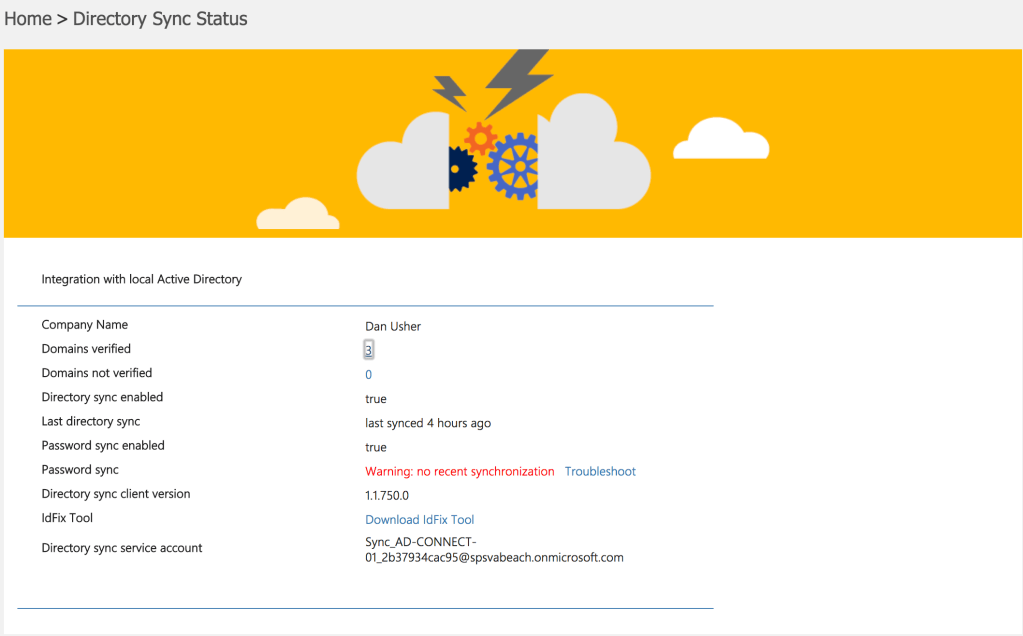
Don’t lose your identity in the Cloud…

If you happen to log into your Office 365 Admin Portal on a regular basis good on you – though perhaps you can get most of your alerts through the Office 365 Admin app on your phone. If you do happen to log in though and you’re using Directory Synchronization by way of either Azure AD Connect or Microsoft Identity Manager, you hopefully don’t stumble upon a message like this on the Home page.

Screenshot 2018-03-24 23.31.07

If you do though, don’t worry, it’s not just a red highlighted bit of text, but it’s a link to your Directory Synchronization status (not DirSync is no longer around… AAD Connect is the way to go these days). What does it mean to your end users if Directory Synchronization is failing? Well, any change that they happen to make to their profile within your on-premises Active Directory won’t be synchronized with Azure Active Directory until the issue is resolved. Not a big deal – right? Well, just think if you changed your password on-premises, you’ll still be using your old password through Office 365.

If you happen to click the error message though you’ll come to a page with this displayed, you’ll note that you see something like this:

Screenshot 2018-03-24 23.28.11

If you’re not familiar with the above, it’s the Sync Status Health page. Typically if things are working good then you’ll see the last time that you sync’d successfully in addition to other pertinent information about your Office 365 tenant’s synchronization status as well as a less stormy picture of the cloud. 🙂

In this case though, the troubleshooting tips are fairly helpful and link to https://support.office.com/en-us/article/fixing-problems-with-directory-synchronization-for-office-365-79c43023-5a47-45ae-8068-d8a26eee6bc2?ui=en-US&rs=en-US&ad=US

In this case, it just happens to be that I turned off the server that the Azure AD Connect tool was running on. Turning the server back and on and the error messages go away and identity changes begin to synchronize once more – life is good.

Categories
Azure Infrastructure Office 365

Azure: Setting up a custom domain for Office 365 by way of Azure Active Directory

If you’re like me, sometimes you like to do things a little more efficiently and elegantly through PowerShell or through the Azure portal when it deals with the underlying infrastructure that’s associated with an Office 365 tenant. If you’re using Office 365 you’ve established a tenant with a .onmicrosoft.com name.  Reminder PSA: You can’t change your tenant name after you’ve created it – at least not right now.  But you can mask it using custom DNS names.

If you’re a little leery of Azure, then perhaps this will help to peel back the onion and bring tears of happiness to your face.

Step 0 – realize what you’re doing 🙂 and also that you probably want to make certain that you have permission to use the domain name that you’re setting up on the Office 365 / Azure instance that you’re going to perform these configuration changes on. Note that if you’re using a domain name already for something else that it might be wise to create a subdomain to tinker with rather than making “adjustments” to the main domain that you’ve got (e.g. something.danusher.com rather than danusher.com).

Step 1 – Head on over to your Office 365 admin portal (https://portal.office.com/adminportal/) and go to the bottom left corner to expand the “Admin Centers” section and click on “Azure Active Directory” (https://aad.portal.azure.com/binarybrewery.onmicrosoft.com). This will launch you to your Azure Active Directory admin center within Azure (alternatively, you can go to portal.azure.com and click on Azure Active Directory from the left most blade to open these settings).

Step 2 – Expand “Azure Active Directory” from the left most blade and then select “Custom domain names” from the blade that appears. This will list out the default tenant name that you have with your Office 365 tenant that was built out with your tenant when it was provisioned.

Screenshot 2018-03-27 21.52.54.png

Step 3 – Add a custom domain by typing in the name of the domain and then determining if you want to use a TXT record or an MX record to verify that you own the domain. If you’re not familiar with how to edit your TXT or MX records, Microsoft has some handy documentation on this over on the Office 365 support documents – https://support.office.com/en-us/article/gather-the-information-you-need-to-create-office-365-dns-records-77f90d4a-dc7f-4f09-8972-c1b03ea85a67

Screenshot 2018-03-27 21.57.20.png

Step 4 – Wait a while. Or as Spence would say while provisioning your User Profile Application, get a cuppa coffee.  DNS sometimes can take a while to provision.

Screenshot 2018-03-27 21.58.58.png

Sadly there are no exciting fireworks through the Azure Portal when you verify ownership of a domain.Screenshot 2018-03-27 22.31.19.png

Just a quick toast that briefly appears in the upper right hand corner of the Azure Portal.

Step 5 – Determine whether you just want to setup Azure AD Connect to get started with Directory and Password Synchronization, or go back to the Office 365 portal and setup the remaining DNS entries to be able to fully recognize the capabilities of Office 365. Nevertheless, you’ll see this screen within Azure upon completion of domain verification.

Screenshot 2018-03-27 22.14.05.png

Back in the Office 365 Admin Center however, you’ll notice that the domain says that it’s still being setup.

Screenshot 2018-03-27 22.34.09.pngStep 6 – Complete the setup of the domain by clicking on the line item associated with the domain name that has been verified by Microsoft Azure.

If I point my name servers from this domain through my registrar to be managed by Microsoft’s name servers, a lot of things just go away as Microsoft manages the domain for me at that point. If I however want to perform these configurations on my own as I have a complex DNS environment, I can do so by adding the values similar to these (fairly standard where you simply replace “potatoe-cloud” with your DNS name)word:

screenshot-2018-03-27-22-35-13.png

After you’ve updated your DNS within your registrar, you’ll see something like this if you happen to have an incorrect record…

Screenshot 2018-03-27 22.48.11.png

In my case I accidentally had an extra character in there – simple cut and paste error. 😐

After making my corrections and verifying settings I received a nice note that all was configured and ready to go.

Screenshot 2018-03-27 22.54.53.png

From there, any new user I create within Office 365 will make use of the @potatoe.cloud domain name rather than the Tenant name.

Congrats on having your Office 365 email accounts now masked as well as user login’s. I’d recommend learning how to setup and use Azure AD Connect so that you’re able to move forward with having your domain identities provisioned with Office 365 / Azure Active Directory to enhance your end user’s experience.

Remember – DNS isn’t that difficult. But it’s easy to mess up and also then make things more difficult.

Categories
Azure Office 365 PowerShell

Office 365: Managing your users through PowerShell

If you’re like me, then you tend to find yourself wanting to automate as much as possible, or at least be able to work with sets of data in a way that quickly allows you to get to the root of an issue rather than clicking through endless screens of information.

In case you were curious, Office 365 makes use of Azure Active Directory behind the scenes for user managment. As Azure Active Directory is an enterprise resource for identity management for cloud hosted applications, Microsoft has gone to great length to create several interfaces to it. Granted, I could just use a REST call through the Microsoft Graph API to create or delete a user through a POST command, but I can also use PowerShell from a Windows based device.

For user management, our first step is to download the appropriate PowerShell Module.  This can be done simply by installing the module through PowerShell running

install-module -name azuread

This will install the PowerShell module specifically for Azure AD and allow you to manage your users. From there before you can make any changes to your user base you’ll need to authenticate. An easy way to do this is as follows:

$creds = get-credential -credential
connect-azure-ad -credential $creds

From there you can parse your users and make modifications to your hearts desire. Running “Get-AzureADUser” enumerates all user objects.  Load it into an array and work with the users as you wish.

Nevertheless, for more on this topic, check out the Microsoft Support docs over at:

https://docs.microsoft.com/en-us/office365/enterprise/powershell/connect-to-office-365-powershell

https://www.powershellgallery.com/packages/AzureAD/2.0.1.3

Categories
Azure Office 365

Don’t turn into a pumpkin because of DirSync with your Office 365 system

I feel like I may have already mentioned this on the Twitter, but I feel like I need to put out a reminder PSA for folks that perhaps were asleep at the terminal or looking at their iPhone playing Pokemon Go… DirSync and AzureAD Sync Service will no longer connect as of 1 January 2018. Only AzureAD Connect will actually be able to connect to AzureAD to allow for imports of projected identities from your on-premises Active Directory or other LDAP based system.

You have been informed.

Why would I be using DirSync you might ask yourself? The primary reason being so that you’ve got all of your users’ identities and attribute information showing up properly within Office 365 (or within other applications that you’re hosting within Azure and need an identity source to pull from). Where do these user identities show up you might ask yourself? Within any contact card or anything that tracks a user.

Moving on… About a year ago, in April 2016, Microsoft deprecated DirSync and Azure AD Sync Services in favor of AzureAD Connect. They did this in a blog post. Some people may have missed it. Others put a sticky note in their cubical and then forgot it when another sticky note was placed on top of it reminding them to renew an SSL certificate.

If you’re not familiar with AzureAD Connect, you probably haven’t logged into your Azure portal (oh, by the way, it’s no longer manage.windowsazure.com, but rather it’s portal.azure.com) or you haven’t logged into the Admin terminal of your Office 365 portal to check on your Directory Synchronization status. Regardless, the time has come to go and figure out what you’re going to do so that your directory synchronization with AzureAD doesn’t go offline and break because of lack of upgrading to what is supported.

How do you go about upgrading to AzureAD Connect? RTM… or read the manual for those that aren’t familiar with acronyms.

Where do I find the manual though?

I’m glad you asked… as a typical search using your favorite search engine probably wouldn’t bring up the results until you clicked on the Search button. . .

Okay, so seriously, where’s the guidance for upgrading?

Check it out here https://docs.microsoft.com/en-us/azure/active-directory/connect/active-directory-aadconnect-dirsync-deprecated.

Alternatively, Microsoft has additional documentation as a part of the AzureAD Connect installation documentation on how to upgrade over here –

https://docs.microsoft.com/en-us/azure/active-directory/connect/active-directory-aadconnect-dirsync-upgrade-get-started

All in all, it’s pretty simple to upgrade to your basic environments. If you have additional complex rule sets for performing combinations of actions while performing a projection into AzureAD from your on-premises AD, you’ll want to go in and figure out what they are within the MIIS Client so that you can recreate them or validate them within AzureAD Connect.

Good luck and hope that you’re able to make the deadline of midnight on the 31st of December as we ring in the new year!

Categories
Azure

Azure’s Access Control Services Retiring

If you’ve been working with Azure for a while you may have come across a need to make use of Azure’s Access Control Services. This service offering or capability effectively allowed developers to create something that was hosted on Azure but have authentication and authorization to be completed performed outside of the application that a developer was building.

In many cases, developers that were looking to integrate with services like Facebook, Twitter, or another Active Directory would make use of ACS to handle the authentication and authorization and allow the developer to focus on what they were developing within their App. This was great in that it was effectively performing a lot of heavy lifting without a lot of code.

As Azure is continuing to evolve, change happens and in this case we see Access Control Services entering a deprecated state where it will no longer be support as of November 7, 2018. What’s all this mean to you? Perhaps nothing if you’re not using ACS. If you are however using ACS, it’s still fully operational, but similar to the Death Star, in the near future it will cease to exist.

More about this activity is available here on the Microsoft Azure Blog – https://azure.microsoft.com/en-us/blog/time-to-migrate-off-access-control-service/

If however you say to yourself, “I’ve been using ACS for a while and my app relies upon it heavily…” Fear not, there’s a published migration path that you can make use of… you can check it out here – https://docs.microsoft.com/en-us/azure/active-directory/develop/active-directory-acs-migration

Nonetheless, consider yourself informed when you’re working with a client or with your fellow developers that you’ll need to consider how to begin building a transition plan to make use of something like Azure Active Directory or another offering of Azure’s per the migration guidance aforementioned. Happy developing!

Categories
Azure Cloud Office 365 Office 365

Office 365 Group Management and Auto-Expiration Public Preview

If you’ve been working with Microsoft SharePoint Products and Technologies, you probably remember a utility that was made available as a part of SharePoint Server 2003 to automatically delete old site collections that hadn’t been worked with in a while. This was an incredibly helpful utility for system administrators that were watching their SharePoint systems grow virally with the use of Self Service Site Collection creation.

If you’re not familiar with Self Service Site Collection Creation, it’s probably because it was removed from the SharePoint Products and Technologies and then brought back. Self Service Site Collection creation was incredibly beneficial to when users needed to get something up and running as quickly as possible but typically meant that users were creating site collections that may or may not have necessarily fit within the taxonomy of sites that were being implemented by their organization. What does that mean? Well, in some instances duplicative sites and site collections that were owned by different individuals that perhaps weren’t knowledgeable of one another were created, nor did they always find out that the other site / site collection existed since SharePoint Search follows the permissions model and trims out things that you don’t have access to see.

With Office 365’s SharePoint Online, site collection followed a similar life cycle where only certain individuals (SharePoint Service Administraotrs) had the ability to create them. This helped to limit the sprawl of site collections and knowledge but in some instances caused end users to use other Rogue IT services as they found the process for creating a new site to be cumbersome.

Enter in Office 365 Groups and the ability for end users to quickly stand up a collaboration group without the need of an approval from an IT Manager or someone concerned with site taxonomy.  This effectively allows end users to provision a document library, a OneNote notebook, a calendar and a running history of messages that have been sent to the group. Sure it’s possible for the overarching administrator to turn this capability off (Groups) but the question then becomes, “Do you want to limit what your users can do with this Software as a Service platform and limit their ability to collaborate?” That’s a question that I know I comes up regularly – primarily when it comes to governance.

Back with SharePoint Server 2003 the added ability to have a script run and determine when a site collection was last modified which gave them the ability to then send an email to the site collection owner asking them if they were still using the site. Alternatively it was possible to just have the script watch and if it didn’t see a change over a certain period the site collection would be deleted.  Pretty handy – this actually was introduced with Office 365 in OneDrive for Business service for when a user’s license was removed for Office 365 (14 days later their OneDrive for Business went away). Fortunately Microsoft has worked on the tooling for the OneDrive for Business capability to allow a little more flexibility as to how this now works.

In similar fashion the Microsoft Office 365 Groups has a capability announced recently to allow for a similar function of a “soft delete” with a 30 day window to get an Office 365 Group back. The messages that this will send seem to be a bit friendlier based on the blog post from the Enterprise Mobility and Security Blog‘s article “Azure AD Automated Expiration for Office 365 Groups in Public Preview“.

Personally I see this as a great capability but also realize that there will be some gotchas. Specifically in that when a Group is created, an Exchange Distribution list is created. This is helpful since you’re able to have message traffic sent to this address. However if you think about the use case where a Group is deleted and the users fail to realize that the e-mail address that they received notifications on now no longer exists, there may be problems for end users.

Additionally it should be noted per the configuration documentation that an Azure AD Premium license is required to implement Office 365 Group Expiration – if you don’t have these they’re available at a per user cost and have several benefits in addition to this.

All in all, definitely an exciting feature and functionality but wondering how things will work for organizations where end users are truly business users that don’t quite understand all the components of an Office 365 Group or what the information lifecycle truly is…

Categories
Azure Cloud

Azure QuickStart Templates

If you’re like me you prefer to automate things as much as possible. In some instances that means using desired state configuration, in other instances it’s launching a series of PowerShell scripts. This saves time and helps to ensure a configuration that’s repeatable and easy to kick off without a ton of work – yes there are parameters that occasionally you have to set (e.g., passwords, IP addresses, etc.).

Enter into the mix that this helps to an extent. Then you start looking at Azure and the Resource Management templates and you realize that you can automate a good chunk of these operations… of course this means that you go out and quickly learn JSON so that you’re able to create your own.

Newsflash – there are quick start templates that Microsoft already has out there for you to use. That’s right, community driven and for the most part Microsoft supported. Where do you find them you might ask? Well if you use a search engine of your choice (Google, Bing, Yahoo, Duck Duck Go) you’ll probably find them rather quickly, but for your convenience they’re also here – https://azure.microsoft.com/en-us/resources/templates/

The templates can be launched directly from the template pages into an Azure subscription or if you find that you want to use these as a starting point, you can open the GitHub repo that’s associated with the templates, fork it and modify it to your hearts desire.

Bottom line? Don’t ignore these resources. You’ll occasionally run into a bug when a template references an older version of an Azure disk image, but to get around that just identify the issue and put in a pull request for the group that maintains that particular QuickStart template to update it.

Categories
Azure Infrastructure

ARM Template Reference Now Available

If you’ve been tracking Microsoft’s Azure cloud offering over the past few years you’ve probably noticed that there have been a few (hundred) changes during that time period. And by hundred, I mean multiple hundreds. . .

One of those changes was to transition from the Azure Service Management interfaces to the Azure Resource Management template model. This methodology has made the development of complete environments through Infrastructure as Code significantly more manageable through resource groups using templates that can be spun up and torn down on demand.

Recently Microsoft released their Azure Resource Manager template reference which guides you from nothing to environment in a pretty rapid fashion. If you’re familiar with Infrastructure as Code using JSON notation then this will be incredibly familiar to you and you may even find yourself liking it.

https://azure.microsoft.com/en-us/blog/azure-resource-manager-template-reference-now-available/